A teacher of mine used to always say at the start of a back bending sequence, “bend so you don’t break.” I love this line and use it often now in my own classes. It couldn’t be more appropriate than it is right now for this week’s pose–Halasana, Plow Pose. Let’s check out the yummy benefits and give it a go!
Benefits
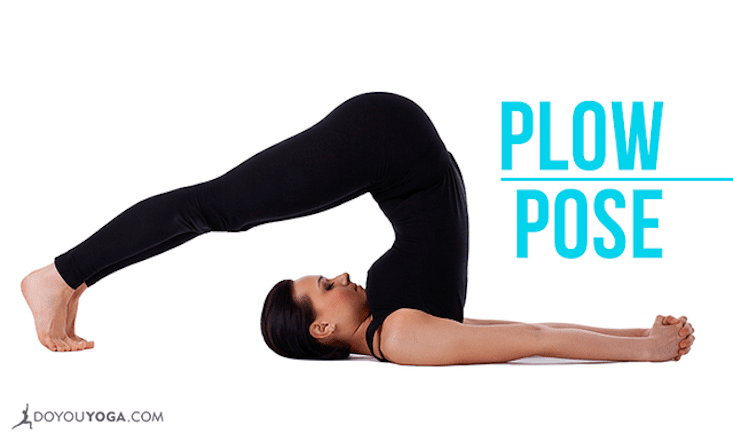
An advanced pose that calms the mind, stimulates internal organs, activates the thyroid, stretches the shoulders and hamstrings, Halasana improves the flexibility of your spine. Bend so you don’t break.
It can help alleviate back pain, bring fresh blood to the brain to help with headaches, sinusitis, and insomnia. It’s a stress reliever and energizes the body. Teachers often sequence it at the end of a class, as it requires a supple body, open hamstrings, and a focused mind.
I love it as a prep pose for Savasana. Yes, you heard that right, a prep pose for Savasana–one of the most challenging poses in all yoga asana.
Step-by-Step
- Resting flat on your back, place your palms on the mat beside you.
- Inhale, activate your core, and lift your feet off the floor until they’re at a 90 degree angle.
- Support your hips and lower back with your hands as you lift them off the floor.
- Continue to lift up as you hinge at the hips and rest your feet directly above your head. Press your toes firmly into the mat beyond your head and energetically press into your heels. Lift your top thighs and tailbone toward the sky and pull your inner thigh into the pelvis.
- Create space between your chin and your chest.
- If you’d like an additional shoulder opener, remove your hands from your lower back, extend them on the mat in the opposite direction, and clasp the hands. Press them down on you mat to lift the hips and thighs up even higher.
- To exit slowly and with control, place your hands on your back, hinge at the hips until your feet are high in the sky above your hips (90 degree angle), and slowly roll down vertebra by vertebra.
Tips, Tricks, and Restrictions
- Think about squeezing your shoulder blades together at the start of the pose to lift up. Once in it, try to create space between the shoulder blades. It’s a minor movement, but can help with proper alignment.
- Lift up, up, and up for a straight spine. We have a tendency to round through the lower back in this posture. Instead, actively lift the hips up high and stack them directly above the shoulders. Engage the lower abdominals and try to create that long, strong and flat back. This adjustment is difficult as it is subtle, but that’s the beauty of yoga–there is always somewhere to go.
- Listen to your body! If your feet can’t comfortably reach the mat beyond your head, use a prop like a chair or a wall to rest your feet on. If it is painful at the base of the neck, use a few folded up blankets to modify. Simply place them flat along the shoulder line, under your upper back and base of your neck. The crown of your head should be flat on the mat while your shoulders and upper back are slightly elevated thanks to the blankets.
- If you have any type of neck injury, lay off this pose for a while or get the all-clear from your doctor before trying it.
- If you’re pregnant and practice this pose often already, you can continue until it becomes uncomfortable on your tummy. If you don’t already practice this pose, wait until Bubba is born to try it out.
- Prep the body with a good warm up to build heat; a Bridge and a Shoulder Stand.
- Follow up with Deaf Man’s Pose if that is in your practice, Wind-Removing Pose, Reclined Butterfly, a seated forward fold like Paschimottanasana, or Savasana.
Have fun and keep us posted on your Plow journey!