Enjoy the challenge of a balancing pose? The strength it takes to hold Warrior II? The intense stretch you receive from a Forward Fold? Even the cleansing feeling of a twist? Think you can’t get all of these from a seated pose?
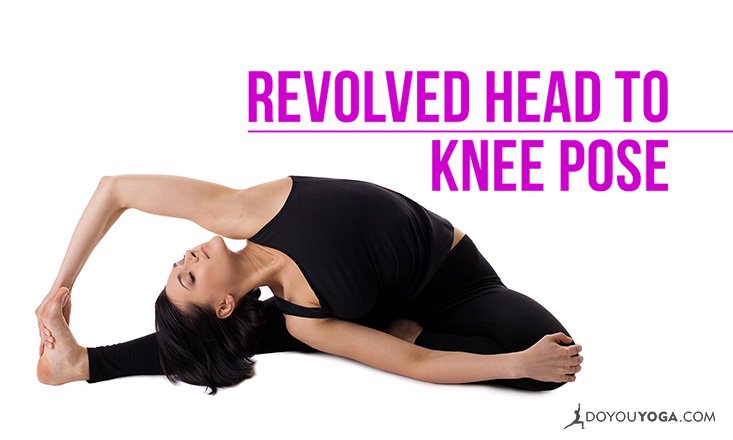
Well my little yogi, you are mistaken. Let me introduce you to Parivrtta Janu Sirsasana, or Revolved Head to Knee Pose.
Benefits
Although this pose is done on the ground, it still offers all of the same benefits you gain from many standing poses. Revolved Head to Knee Pose stretches your neck and shoulders, your spine, and the backs of your legs. The slight opening twist stimulates your core, and awakens your digestive system, kidneys, and liver.
Finding comfort in this pose allows your body to feel long and graceful, at the same time challenging your flexibility in a different way.
How to Do the Pose
- Find a comfortable seat on your mat with legs spread wide. Feel the connection of your sitz bones to the ground beneath you as you sit up tall, spine straight, reaching long through the crown of your head.
- Bend your left knee and draw the bottom of your left foot to the inside of your right thigh. Keep your right leg extended long. Reach out through your heel with your right foot flexed.
- Take a deep inhale as your reach both arms into the sky, then use your exhale to hinge at your right hip, reaching your right side body over your right leg.
- Wherever your right arm meets your right leg, press into this connection. The energy from this connection will help you to open your torso and twist slightly towards the sky. Use your core to hold your torso here.
- Relax your right arm to the ground. Inhale as you extend your left arm over your head then out towards your right toes, reaching energy out through your left fingertips.
- Take note of how your body weight is distributed on your sitz bones. Make sure to keep your left sitz bone connected to the ground.
- Take an inhale as you twist your torso, opening your heart even more towards the sky. Imagine you are showing your face to the sun, and hold here for three to five breaths.
- To exit the pose, untwist your torso and release your left arm gently to the ground. Your torso should remain forward, looking down towards the ground. From here, round up to seated as you inhale slowly.
- Repeat the pose on your left side.
Modifications
This pose is a very deep stretch for many different muscles in your body. Remember to be gentle and ease into the pose.
- If your hamstrings are feeling tight, keep your right knee bent. You will find that it is more beneficial to your body to begin with a bent knee, and work to straighten it as you become more flexible.
- As with any seated pose, it’s helpful to use a prop underneath your sitz bones. This will allow the leverage your body needs to sit with a straight spine, rather than hunching your spine over. Try a blanket, bolster, or even roll your mat beneath you.
It’s hard not to feel a deep sense of accomplishment after practicing Revolved Head to Knee Pose. Remember that alignment is key with this one: it may feel good to be able to fold all the way over your leg. However, if your body is out of alignment, it could cause injury or hinder your ability to advance in the pose over time.
As with every pose in yoga, Revolved Head to Knee Pose has much to teach us. Patience, self-care, and even surrender are the main take-aways for me.
What does this pose teach you? Do feel a strong sense of challenge and accomplishment after practicing this pose? Share with us below!


