Eight-Angle Pose (Astavakrasana) is a perfect example of a posture that is much more about understanding what goes where, rather than having enough strength to do it.
As tricky as it may appear, once you find the balance point and figure out how to utilize certain body “locks,” it is actually much easier to hold than many other arm balances. The biggest barrier for most people is a lack of range of motion in the hip.
Both the groin and the outer hip (especially the gluteus muscles) must be open in order to do this arm balance. Thus, stretching these muscles is an excellent place to start when warming up for eight-angle pose.
Warming Up with Compass Pose
Compass is ideal for preparing for this arm balance since it requires that you externally rotate the leg and open through the inner thigh in the same way you do in the balance.
- From sitting, take the right leg in front, bending the knee slightly. Then, use your hands to draw your left leg up and over your left shoulder as if you were slipping on a backpack. If the thought of slipping your leg onto your shoulder like a backpack sounds ridiculous, don’t give up! Just take it back a notch and work on the inner thigh flexibility from a different position, such as Wide-Legged Forward Bend or Wide-Angle Seated Forward Bend.
- If you’re continuing with Compass, take your left hand to the floor inside of the left thigh and ground the palm firmly. Continue to stabilize with your left hand as you bring the right hand to the outside of the left foot and begin to draw the leg straight. Listen to your body here—if you can’t quite straighten the leg, don’t force it. When you hit a point that feels like you can’t go any further, just breathe there.
- Hold the posture for 5 to 10 breaths, then repeat on the second side.
 Credit: Sarah Smith
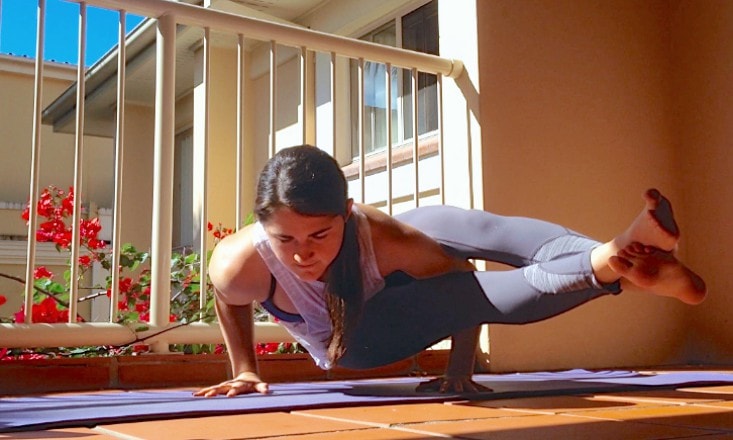
Eight-Angle Pose Step-By-Step
- Set yourself up. You can actually move directly into Eight-Angle from Compass. First, bend your right knee so that it is back in its “backpack” position over the shoulder, and release your right hand to the ground. Both hands should now be in front of the hips, shoulders width distance apart. From here, take your right ankle and place it on top of your left ankle. The position of the ankles here is extremely important—it is one of two body “locks” that makes this posture stable, so squeeze them tightly together.
- Test run. Once everything is in the right place, simply start shifting the weight forward into your hands and lifting your seat off the ground a few times (without doing anything with your legs). Even if this is as far as you get with the posture, it’s an excellent way to start to build some substantial strength in the upper body and the wrists.
- Put it all together. The next part of this posture includes three important things that essentially need to happen all at the same time: 1) bend your elbows to 90 degrees (like Chaturanga) and let the chest come forward but not down—think about pointing your heart straight ahead); 2) use your oblique muscles to direct your legs over to the left, this motion is completely initiated by the core; 3) bring your right thigh to meet your left to squeeze your bicep tightly. I cannot emphasize the importance of 3) enough—this is the second body “lock” that makes the posture possible. It requires a bit more inner thigh strength that you might think you need, but once you have the grip on the bicep the posture is solid.
- Try it on the other side!
 Credit: Sarah Smith
 Credit: Sarah Smith
Variations
- Hand-to-chin: The easiest way to come into this variation is by starting with the right elbow on the floor before you lift off. Place your right hand comfortably on the chin, and from there you can use the pressure of your right elbow and left hand into the floor in order to lift up. This variation requires more power from the chest, so think about squeezing your upper arms in towards one another in order to activate the pectoralis muscles.
- Hand-to-wrist: The challenge with this variation is that it requires your arms to be a bit narrower than before. Once again, you’ll want to have your arms in the correct position on the floor before you lift yourself up. The most important thing here is that you’re distributing the weight correctly in the flattened palm, since it’s doing most of the heavy lifting. Remember, spread your fingers wide and grip the pads of the fingers down firmly into the mat. Once you’ve got that down, think “chest forward, hips back” to balance your weight.
 Credit: Sarah Smith
 Credit: Sarah Smith
Tips
- For many here, their biggest limitation is at the hips. Don’t be discouraged if you have to take a step back and just work on the flexibility aspect. Everything goes a lot smoother when you are able to work with your tissue, instead of straining against it.
- The control comes from the core. If you feel like you are lacking in this area, practice poses like Boat Pose and Half Moon to build some more strength. Half Moon Pose in particular is massively helpful in building the oblique strength you’ll need as you try to send your legs out to the side in Eight-Angle Pose.
- Take care of your wrists. Make sure you take the time to stretch out your wrists before and after you practice, and know when to call it a day. If the wrists feel achy or sore, it’s best to lay off them for a few days. You may also want to explore how to distribute the weight properly in your hands in more stable postures such as Plank and Chaturanga.