As the chaos of the holiday season approaches, my yoga practice lately has centered around sequences that are both grounding and invigorating, which sums up this week’s yoga pose perfectly.
Wide-Legged Forward Bend, or Prasarita Padottanasana, is one of my favorite poses to incorporate at the end of a vigorous standing series to cool down and prepare the body for relaxation. This pose has a variety of options and modifications to suit every level, from beginner to advanced.
Everyone can enjoy all the benefits the pose has to offer!
Benefits Of Wide-Legged Forward Bend
This pose stretches and strengthens the inner and outer leg, as well as the ankles. It’s a quick and easy pick-me-up if you’re feeling tired or having a stressful day, as it can help with headache and fatigue by getting circulation moving to your brain.
Wide-Legged Standing Forward Fold can also help to stretch out the spine and relieve minor backaches, although those with lower back issues should avoid moving too deeply into the full expression of this pose.
Wide-Legged Forward Bend Step-By-Step
- From Mountain Pose (Tadasana), turn to face the long edge of your yoga mat and step or hop your feet wide and parallel, approximately 3 to 4 ½ feet apart depending on the length of your legs (taller people should take a wider stance).
- The inner (big toe) edges of the feet have a tendency to collapse inward, so press down firmly and evenly through the outer (pinky toe) edges of the feet. Take a peek down at your feet and ensure that they are indeed parallel to one another and that the toes aren’t pointing outward.
- Rest your hands on your hips and inhale deeply, lengthening the spine. Reach the crown (top) of your head high and keep the chest open and full.
- On an exhale, hinge at the hips and begin to fold forward over the legs. If you can, take your fingertips or palms onto the ground—if this isn’t accessible to you just yet, rest your fingertips on a block or take a slight bend in your knees.
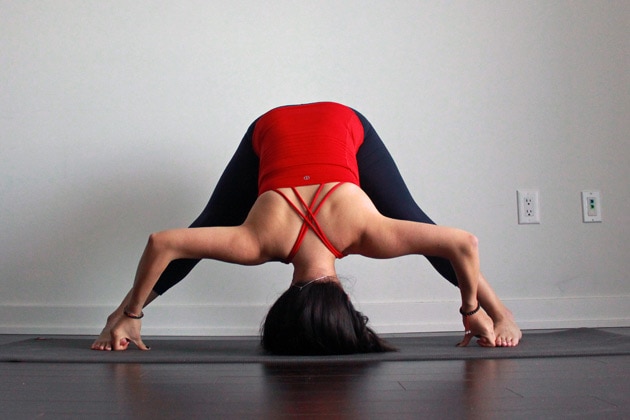
- Take a couple of deep breaths as you allow your body to ease into the pose. If you can comfortably take the palms onto the ground, you can begin to walk your hands between your feet, with the elbows bent and the top of the head moving toward the ground between your hands. Otherwise, feel free to remain where you are.
- Draw your shoulders away from your ears and shift the weight slightly forward into the balls of the feet to avoid leaning back into the knees. Stay in the pose for five to 10 full, deep breaths.
- To come out of the pose, take your hands back onto your hips, engage your core, and rise to stand on an inhale. Walk or hop the feet back to Mountain Pose.
Tips
- A good gauge to measure the appropriate distance of the feet in this pose is to extend the arms out alongside the body; the feet should fall just beneath the wrists.
- The key action in this pose is to maintain the length along the spine and the openness in the chest. If you feel any discomfort in your legs or lower back, take as much of a bend in your knees as you need to in order to rest your fingertips comfortably on the ground or on a block while maintaining the integrity of the pose. It doesn’t matter how far forward you can fold!
- In all forward-bending poses, imagine that the front of your body is lengthening equally with the back of your body. If your spine starts to round and your chest begins to collapse, it may be a sign that you’ve moved too far.
- To explore a deeper variation of the pose, you can try hooking onto the big toes with the pointer and middle finger of each hand, or try clasping the outer edges of the feet.
Image Credit / Yogi: Julia Lee