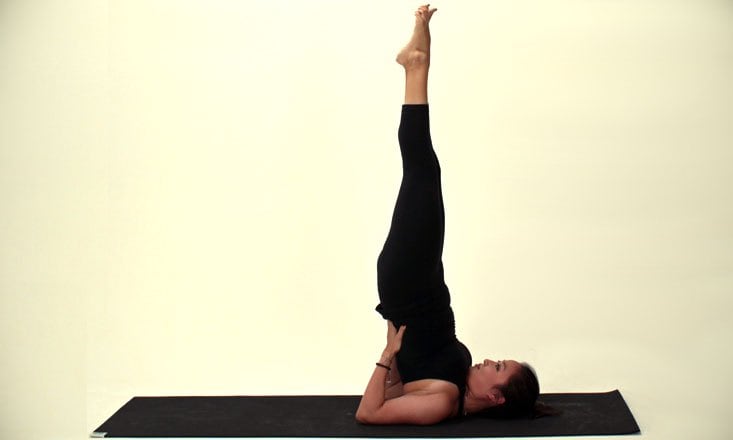
Due to its many benefits, Supported Shoulderstand Pose (Salamba Sarvangasana) is thought to be the “Queen” of yoga poses (Headstand is thought to be the “King”), and is a great one to have in your yoga toolbox at this time of year!
Benefits of Supported Shoulderstand
Supported Shoulderstand stretches the neck and shoulders, and strengthens the legs, glutes, arms, and core. The pose also stimulates the abdominal organs and the thyroid gland, aiding with digestion and the regulation of hormones, and can also be beneficial for anxiety, stress, and mild depression.
Those with any neck injuries should practice this pose with caution, using folded blankets or towels for support beneath the shoulders to protect the cervical spine (see Tips below).
Supported Shoulderstand Step-By-Step
- Begin lying on your back with your arms by your sides, then bend your knees and place the soles of your feet on the floor.
- With an exhale, begin to contract your abdominal muscles and press your upper arms into the floor to lift your feet and lower back away from the floor, drawing your front thighs toward your chest.
- Bend your elbows and place your hands on your low back, then draw your elbows and shoulder blades toward one another. Spread your palms fully across your back body and continue to lift your hips until they stack directly over your shoulders and your spine is relatively perpendicular to the floor.
- Keep your elbows approximately shoulder distance apart, actively countering the tendency for them to splay out to the sides, and ensure that more weight is placed in your shoulders and upper arms than your head and neck.
- With an inhale, begin to extend your bent knees and straighten your legs. Keep your legs together and lift actively through the balls of your big toes, lengthening your tailbone toward the ceiling and extending through the inner edges of your legs.
- Relax your face, throat, and jaw. Firm your shoulder blades against your back and move your sternum toward your chin. Gaze softly towards your chest.
- Remain here anywhere from 5 to 15 breaths. To come out of the pose, bend your knees on an exhale, and gently walk your arms out from beneath you as you roll onto your back one vertebra at a time.
Tips
- Even if you don’t have neck injuries, it’s recommended to use props in this pose to create more freedom and space for your neck. To do so, fold and stack several firm blankets or towels large enough to support your shoulders, then place your mat on top to keep your upper arms in place while inverting. The idea is to create just enough height so that when you place your shoulders on the blankets, your head is resting comfortably on the floor with your neck in a neutral position. When lying down, your forehead and chin should be relatively parallel to the floor. Generally, the stiffer the shoulders, the higher the support will need to be.
- Ensure that you don’t move your head or look from side to side at all in this pose to avoid putting additional strain on your neck.
- Those new to the pose can attempt a Half Shoulderstand variation by lifting the legs only halfway as opposed to fully vertical, or try extending only one leg at a time.
How did you like Supported Shoulderstand Pose? Share your experiences in the comments!


