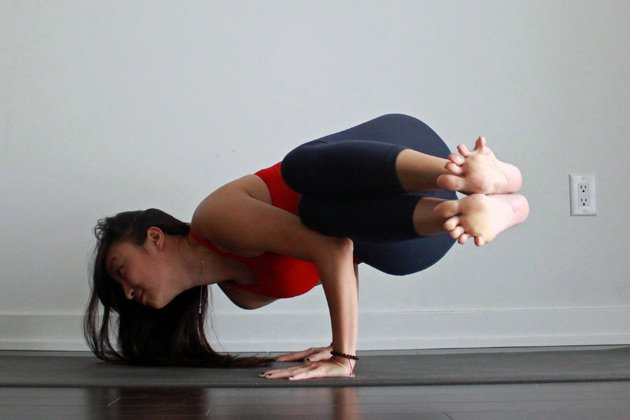
The instructions for Side Crow pose (Parsva Bakasana) might seem lengthy and complicated, but it’s really just Crow pose with a fun twist (literally and figuratively!). I remember being in class, watching an instructor demonstrate the pose effortlessly, while my efforts to maintain the twist while balancing on my hands seemed completely and totally futile. As with all things, however, practice makes perfect, and now I’m the one demonstrating the pose and encouraging my students to fly (though admittedly there are still days when I feel just as wobbly and just as new to the pose). Take your time with this one, and remember to have fun with it — the learning lies in the journey!
Benefits Of Side Crow Pose
Side Crow pose strengthens the arms, wrists and shoulders, tones the belly and spine, and as a twisting pose, helps promote detoxification of the body. The pose also helps to improve balance and focus and reminds us to approach our practice with a sense of playful curiosity and a willingness to launch ourselves out of our comfort zone, and is an excellent foundation pose for other fun arm balances such as Eka Pada Koundinyasana I and Dwi Pada Koundinyasana.
Side Crow Pose Step-By-Step
- Begin standing in Mountain pose (Tadasana), with the big toes touching and the heels slightly apart.
- Inhale to find length along the spine, lifting the crown of your head high, and as you exhale, take a deep bend in your knees and sink your hips back and down, as if you’re sitting into an invisible chair. Keep the legs together and the knees pointing forward.
- Fold your palms together at heart center, inhale to lengthen your spine, and as you exhale, take your left elbow to the outside of your bent right knee, twisting open to the right.
- Continue to move more deeply into the twist with every breath, bringing your outer left arm closer toward the right knee.
- Once you’ve found your maximum rotation, sink your hips deeply, then begin to plant the palms down on the floor beside you — you will likely need to come up onto the balls of the feet to do so. Ensure that the hands are shoulder distance apart and the fingers are spread wide.
- Keep the gaze slightly forward of the fingertips and bend your elbows straight back and to a 90 degree angle (like a Chaturanga arm). Note the tendency for the shoulders to dip here, and actively lift the shoulder heads to be in line with the elbows.
- Shift your hips slightly toward the right — this should naturally begin to lighten the weight in the feet and increase the weight in the hands. Slowly begin to float both feet off the floor and draw your heels toward your buttocks.
- Keep your knees stacked directly on top of one another and lift your shins parallel to the floor. Remember to lead with the heart and press down evenly through your palms.
- Continue to refine the pose by working to straighten the arms over time.
- Remain in your expression of the pose for up to 5 full breaths, then gently lower your feet to the ground on an exhale. Repeat on the other side whenever you feel ready.
Tips
- There are two options for balancing this pose — using both arms as a “shelf” for the hips, or using one arm as the balance point. While using both arms requires a deeper twisting action in the torso, using one arm requires more upper body strength. Play around and figure out where feels like the most appropriate place for you to begin.
- Using blocks and/or bolsters to support your outer hips can help you find the key actions of this pose without the challenge of trying to balance at the same time.
- Placing some blankets, pillows or cushions around your mat as a “landing pad” can help fledgling flyers overcome fear!
- For a more advanced variation, try extending both legs straight for Dwi Pada Koundinyasana, or straightening then scissoring the legs apart for Eka Pada Koundinyasana I.
- Good preparation for this pose includes strong core work, ensuring your chaturangas are solid, and doing some deep twisting and hip-opening poses to invite spaciousness and strength into the body.


