Did you know? Your yoga mat is also a mirror—the way that you appear on your mat often reflects the way you appear in your life.
One of the things that my practice has taught me is that it’s much easier for me to move toward what feels good as opposed to staying present through the hard stuff. But we all need some balance in our lives, including a little bit of challenge to keep inspiring us to be at our best.
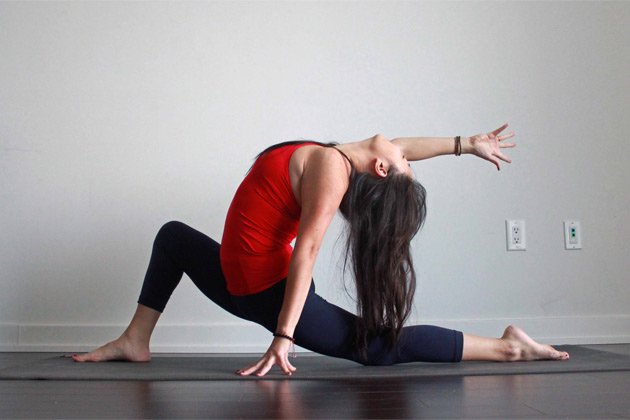
Anjaneyasana or Low Lunge Pose demands a strong sense of balance combined with a certain degree of openness in the legs, hips, and groin, all in a deceptively easy looking package.
Now one of my favourite poses to warm up, Low Lunge always reminds me that not everything is as it appears, and that regardless of the situation, it is always better to remain open than to close.
Benefits of Low Lunge Pose
Low Lunge is a great pose to stretch out tight quadriceps, hamstrings, groin and hips, and encourages a full range of motion in the lower body. As such, this pose is perfect for athletes such as runners and cyclists, as well as those who sit at desks all day.
Depending on which variation you take, it can also create a wonderful opening sensation in the chest and abdomen.
Low Lunge Pose Step-By-Step
- Begin in Downward-Facing Dog or Adho Mukha Svanasana. On an exhale, step your right foot forward between your hands.
- Lower down onto your left knee and release the top of the left foot on the ground.
- Ensure that the right knee is stacked directly over the right ankle, and isn’t moving forward toward the toes or outward to the left or right (this protects the knee from injury). Keep the knee directly over the ankle if it feels like enough for your body—you should feel a comfortable stretch along the left front thigh and groin. For a deeper sensation, you can inch the right foot forward on the mat until you find an edge that feels appropriate for your body.
- Take your fingertips to the ground on either side of your hips (you can also rest both hands on the front knee if taking the fingertips down feels like too much) and relax your shoulders away from your ears. As you continue to breathe deeply, soften the weight of your body down into your hips, and draw your tailbone down toward the ground.
- Feel free to remain here, with your hands on your knee or your fingertips beside you for support, or experiment with extending one or both arms up alongside your ears and moving into a backbend (as shown above). Take five to 10 breaths in your expression of Low Lunge, whatever that might look like.
- To come out of the pose, tuck your back toes under, plant your palms down on the mat, and make your way back into Downward-Facing Dog. Take several breaths in Down Dog, bending the knees, then repeat on the other side.
Tips
- If at first you feel wobbly and unbalanced in this pose, try practicing against a wall. Taking the short side of your mat against the wall and pressing the big toe of your front foot into the wall may help you find some more stability.
- If you feel any pain or discomfort in the back knee, you can fold the long side of your mat over or take a folded towel or blanket under your knee for added support.
- As with any yoga pose, building from the ground up ensures a strong foundation. The more precise the placement of the feet and legs, the more stable and balanced the overall pose will feel.