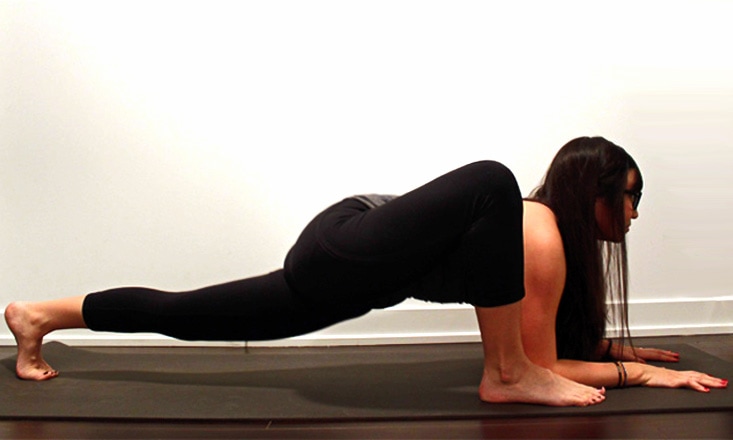
Like Pigeon, Lizard Pose (Utthan Pristhasana) is another wonderful pose for cranky, misbehaving hips. In my classes, I often sequence Lizard and Pigeon together, as I find they create a beautifully balanced stretch for the inner and outer hip.
Not only is Lizard a great pose in and of itself, it’s also a great preparatory pose for active, Yang-style arm balances such as Eka Pada Koundiyanasana II, and can also be an amazing Yin-style stretch when the back leg is left lowered.
Incorporating both active and passive poses in your yoga practice is important to maintaining balance, on and off the mat.
Benefits of Lizard Pose
Lizard Pose is a great stretch for the hip flexors, the hamstrings, and the quadriceps. Incorporating Lizard into your yoga practice can help to improve the flexibility of your hip ligaments and strengthen the muscles in your legs.
Since the hip and pelvis area is the foundation of alignment in so many yoga poses, moving the hips through their full range of motion ensures that your body and your practice remain healthy and strong.
Lizard Pose Step-By-Step
- Begin in Downward-Facing Dog (Adho Mukha Svanasana). On an exhale, step your right foot forward to the outside (pinky finger) edge of your right hand. Both arms should be to the left of the right leg.
- Lower your left knee down onto the ground and release the top of your left foot. Take a look down to ensure that the right knee isn’t moving past the right ankle, and distribute the weight evenly across both hips.
- Sink your weight down into your hips and check in with your body. If you feel comfortable, lower down onto both forearms. Keep the chin lifted and the chest open.
- To move even deeper into the pose, curl your left toes under and press up into the ball of the left foot. Actively lift the inner left thigh and press the left heel back while reaching the chest forward.
- Remain in your expression of the pose for 5 to 10 breaths. To come out, plant your palms down on the mat and step your right foot back to Downward-Facing Dog, resting there for several breaths before repeating on the other side.
Tips
- Don’t worry if the forearms can’t come down onto the mat just yet. Work on softening into the hips as much as possible, and try placing a block underneath the elbows as you begin to find more openness in your hips. If the back knee feels uncomfortable, fold the mat over lengthwise or tuck a folded blanket underneath the knee.
- Gently hugging the muscles toward the midline of the body can help to distribute the energy of the pose and transform the quality of your experience while in the posture.
- There’s a major tendency to drop the head and collapse through the chest in Lizard Pose. Keeping the head and neck aligned with the spine by lifting the chin slightly and sending the gaze forward allows for more extension along the body (rather than contraction).
How do you feel doing Lizard Pose? Which areas do you struggle with the most? Share your experiences with your DOYOU friends!


