As the seasons begin to shift and we enter the period of transition, I’m finding it more and more important to stay grounded and find some balance amidst the winds of change.
Head-to-Knee pose (Janu Sirsasana), a forward bend with a subtle twist, offers us the perfect opportunity for introspection and renewal. We are reminded of our own ability to create space in our bodies and our minds by wringing out what no longer serves us, and moving toward what feels good rather than remaining stuck in resistance.
Benefits Of Head-To-Knee Pose
As a forward folding posture, Head-to-Knee pose is calming and relaxing, and can help with anxiety, insomnia, headaches, and mild depression. Physically, the pose stretches the spine, shoulders, hamstrings and groins, stimulates the liver and kidneys, and also improves digestion.
Head-To-Knee Pose Step-By-Step
- Begin seated in Staff pose (Dandasana), with both legs extended straight out in front of you, spine long.
- Bend your right knee and bring the sole of your right foot to meet your inner left thigh. The outer (pinky toe) edge of your right foot should be on the ground, and the heel should be just in front of the groin.
- Turn your torso to face the left foot. Keep the left foot flexed and active, and energetically press down through the heel of the foot to engage the left leg.
- On an inhale, extend both arms up alongside your ears. Reach your fingertips toward the ceiling and lengthen evenly along both sides of your body.
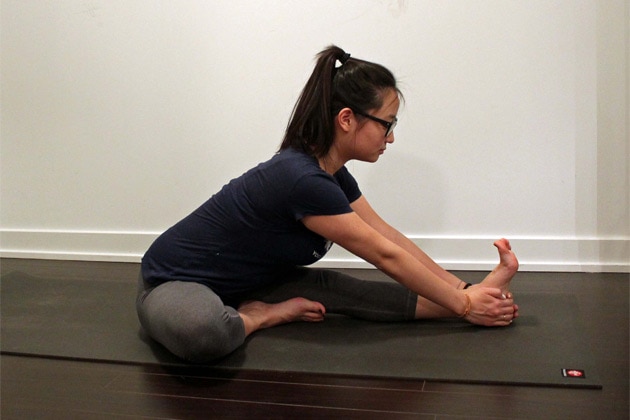
- Maintaining the length along the spine, hinge at the hips on your next exhale and begin to fold forward over your extended leg. Let your hands fall wherever they may — the ground on either side of the extended leg, holding on to the calf, or perhaps even holding on to the left foot.
- Avoid the tendency to collapse the chest and round the spine here in an effort to move deeper into your fold. Keep your shoulders back and relaxed away from your ears, broaden across the collarbones, and reach your sternum toward the toes of your left foot.
- Remain in the pose for 5-10 deep breaths. On an inhale, make your way back to an upright position, switch your legs and repeat on the other side.
Tips:
- If the hamstrings are feeling unhappy, try using a folded blanket, foam block or bolster just underneath the sit bones to offer some lift and support. A blanket or bolster under the bent knee is also a great option if the hips are feeling tight as well.
- If it feels challenging to reach for the foot of the extended leg, loop a strap around the ball of the foot and hold on to the ends of the strap with your arms fully extended. Keep your spine long and your chest lifted, and walk your hands lightly along the strap as you start to open up rather than using the strap to pull your upper body forward.
- Try sequencing a long hold of Janu Sirsasana at the end of a vigorous flowing practice to begin to cool down and bring awareness back in to your body and your breath.
- You have the option to make this pose as restorative or as challenging as you like by choosing the intensity of your forward fold. Reaching the chest actively toward the foot of the extended leg will create stronger sensations; allowing the body to round and gently fold over the extended leg can make the pose more passive and relaxing. If you choose to take a passive variation, ensure that all your muscles are soft and relaxed as opposed to actively engaged.