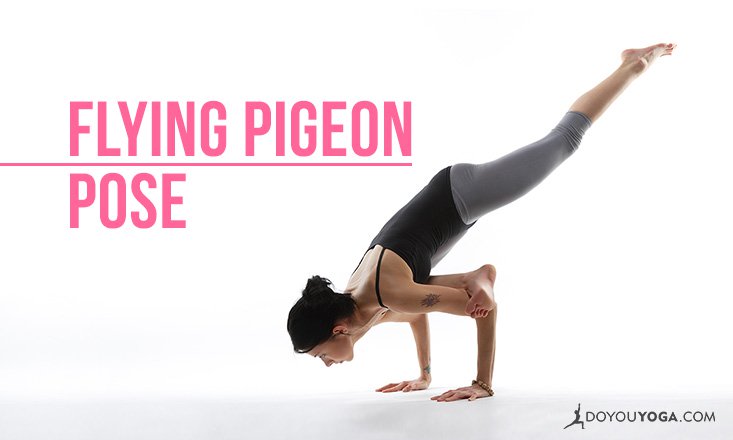
I recently dug up a picture of myself doing Flying Pigeon pose (Eka Pada Galavasana) back in 2010, and the difference between now and then is obvious. While I thought back then that I had good form and that I looked pretty impressive, there were so many ways that I could improve.
Indeed, this pose can be challenging in all aspects of the word — it demands a considerable amount of openness in the hips, a great degree of core and upper body strength, as well as a healthy dose of courage to overcome the (very understandable) fear of falling flat on your face!
But the more effort that we invest in our practice, the more we are rewarded — not only physically, but with the humbling knowledge that there are so many wonderful ways in which we have yet to grow.
Benefits of Flying Pigeon Pose
Flying Pigeon pose strengthens the shoulders, wrists, arms and core, and stretches the hips and legs. The pose can also help to improve balance and stimulate the digestive organs. Approach this pose with caution if you have any hip, knee or wrist injuries.
Flying Pigeon Pose Step-By-Step
- Begin standing in Mountain Pose (Tadasana). Cross your right ankle just above your left knee, and actively flex your right foot so your toes are pointing back toward your knee.
- As you exhale, bend your left knee and begin to send your hips back and down as you energetically push your bent right knee away from your body. (If this already feels like enough for you, stay here with your palms folded together at heart center to invite the hips to open.)
- Slowly lean forward and release your hands down to the ground in front of you. Plant your palms shoulder-distance apart and ensure that your fingers are spread wide. (If your palms don’t comfortably come down onto the ground, rest your hands on a pair of blocks and stay here, sinking your hips back and down.)
- With the palms planted, come up onto the ball of your left foot and wrap the top of your right foot around your upper left arm. Take your right knee as high up your right arm as you can.
- Begin to bend your elbows straight back (like Chaturanga), using your upper arms as a shelf for your right leg to perch on.
- Send your gaze and your chest forward, and begin to experiment with grounding through the palms, lifting the left foot up off the ground and drawing the left heel in towards your body. (If your balance feels particularly unsteady, stay here and simply work on shifting your weight forward and making the weight in the back foot light.)
- Keep drawing your elbows in and extend your left leg straight back behind you. Reach out vigorously through the ball of your left foot to create a strong line of energy from the lifted leg out through the crown of the head.
- Remain in your expression of the pose for up to 5 breaths, then gently release the left foot back down to the ground. Repeat on the other side whenever you feel ready.
Tips
- It’s important to find a strong connection between the shin of the right leg and the upper arms in order to feel stable coming into flight. Make sure to wipe down any sweat that’s accumulated on your arms before hooking the toes of the right foot tightly around the upper left arm and working the right knee as high up the upper right arm as possible.
- Protect your knees by keeping your right foot flexed throughout the entire duration of the pose.
- Use a strap around your upper arms if the elbows have a tendency to splay apart.
- Ensure that your knuckles are rooting down into the ground and the palms aren’t cupping in the arm balance to protect the wrists.
Be patient with this one and work at whatever level feels appropriate for your body. Work on opening the hips by holding poses like Pigeon for extended periods of time, and developing upper body strength by moving from Plank to Chaturanga and back again.


